“`html
Table of Contents
- Can You Really Achieve Perfect Crispy Fried Tortellini in Under 20 Minutes?
- What Makes These Fried Tortellini Truly Irresistible?
- Mastering the Clock: Timing is Everything
- Let’s Get Frying! Your Step-by-Step Guide
- Nutritional Breakdown: Indulgence with Awareness
- Healthier Twists: Lighter Bites, Same Great Flavor
- Elevate Your Experience: Serving Suggestions
- Avoiding Pitfalls: Common Mistakes to Sidestep
- Keeping Them Fresh: Storing Your Fried Tortellini
- Frequently Asked Questions
Crispy Fried Tortellini Recipe with Garlic and Parmesan: The Ultimate Snack for Any Occasion
Can You Really Achieve Perfect Crispy Fried Tortellini in Under 20 Minutes?
In today’s fast-paced world, finding that perfect snack or appetizer that’s both incredibly delicious and lightning-fast to prepare can feel like a quest. Are you tired of pre-packaged options that lack soul, or elaborate recipes that demand too much time? What if I told you that you could achieve golden-brown, shatteringly crispy fried tortellini, infused with savory garlic and sharp Parmesan, ready to be devoured in less time than it takes to stream half a sitcom episode? This Crispy Fried Tortellini Recipe with Garlic and Parmesan is not just a recipe; it’s your new go-to for impromptu gatherings, game nights, or just a delightful solo treat. Forget bland, boring snacks – we’re talking about a flavor explosion that’s deceptively simple to create.
What Makes These Fried Tortellini Truly Irresistible?
The magic of this recipe lies in its simplicity and the quality of its components. Each element plays a crucial role in transforming humble tortellini into a snack sensation.
The Star of the Show: Tortellini
- 1 (9-ounce) package fresh cheese tortellini: The foundation of our delicious creation! Fresh tortellini offers a tender bite that crisps up beautifully when fried. Avoid the dried kind for this recipe. If you can find them, refrigerated tortellini (often found in the dairy aisle) work wonderfully.
The Crispy Coating
This is where the satisfying crunch comes from. We’re keeping it simple yet incredibly effective.
- 1 cup all-purpose flour: Provides a light, even coating that adheres to the tortellini.
- 1/2 cup grated Parmesan cheese: Adds a salty, nutty depth and helps create those delightful crispy bits. Use finely grated Parmesan for best results.
- 1 teaspoon garlic powder: Delivers a potent punch of garlic flavor without the risk of burning fresh garlic.
- 1/2 teaspoon dried Italian seasoning: A fragrant blend of herbs like oregano, basil, and thyme that complements the cheese and garlic perfectly.
- 1/4 teaspoon black pepper: A touch of spice to awaken the palate.
- Pinch of salt: Enhances all the other flavors. Adjust to your preference, especially considering the saltiness of the Parmesan.
The Flavorful Finish (Optional but Recommended)
A little something extra to elevate your fried tortellini:
- 1-2 cloves garlic, minced (for infusing oil or fresh sprinkle): For a more intense, fresh garlic aroma.
- Fresh parsley, chopped (for garnish): Adds a pop of color and a hint of freshness.
- Extra Parmesan cheese (for serving): Because you can never have too much!
The Frying Medium
- Vegetable oil or canola oil, for frying: A neutral-flavored oil with a high smoke point is ideal. You’ll need about 2-3 inches in your pot.
Flavor-Preserving Substitutions
- Tortellini: While cheese is classic, try spinach and ricotta or even a meat-filled tortellini for a different twist. Just ensure they are fresh or refrigerated, not dried.
- Parmesan: Pecorino Romano offers a sharper, saltier flavor. A blend of Parmesan and Pecorino can also be fantastic.
- Italian Seasoning: Use individual dried herbs like oregano, basil, or thyme. A pinch of red pepper flakes can add a delightful kick.
- Garlic Powder: For a more pronounced garlic flavor, consider frying a couple of thinly sliced garlic cloves in the oil before you start frying the tortellini, then remove them.
Mastering the Clock: Timing is Everything
Compare this to the average recipe that might involve simmering sauce for hours or complex dough preparation, and you can see why this crispy fried tortellini recipe is a game-changer. It fits perfectly into a busy schedule, proving that gourmet snacking doesn’t require a gourmet amount of time.
Let’s Get Frying! Your Step-by-Step Guide
Follow these simple steps to achieve perfectly crispy fried tortellini every single time. Remember, the key is hot oil and a not-too-crowded pan!
Step 1: Prepare Your Tortellini
If your tortellini is fresh and hasn’t been cooked, there’s no need to pre-boil them for this recipe. We want them firm so they hold their shape during frying. If you’re using pre-cooked refrigerated tortellini, pat them thoroughly dry with paper towels. Excess moisture is the enemy of crispiness and can cause dangerous splattering in hot oil.
Step 2: Create the Crispy Coating
In a shallow bowl or a large resealable plastic bag, combine the flour, grated Parmesan cheese, garlic powder, Italian seasoning, black pepper, and a pinch of salt. Whisk or shake gently to ensure everything is well combined. This dry mixture is what will give our tortellini that irresistible golden crunch.
Step 3: The Art of Frying
Pour your frying oil into a heavy-bottomed pot or Dutch oven, ensuring it’s at least 2-3 inches deep. Heat the oil over medium-high heat until it reaches about 350°F (175°C). You can test the oil’s temperature by dropping a tiny bit of the flour mixture in; it should sizzle immediately and float to the surface. Carefully add the dried tortellini to the hot oil. It’s crucial not to overcrowd the pot; fry in batches if necessary. Overcrowding will lower the oil temperature, resulting in soggy, greasy tortellini instead of crispy ones. Fry for about 3-5 minutes, or until they are golden brown and delightfully crispy. Use a slotted spoon or spider strainer to remove the fried tortellini from the oil, allowing excess oil to drip back into the pot.
Step 4: The Flavor Finale
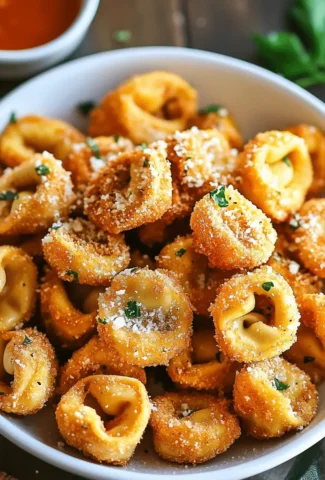
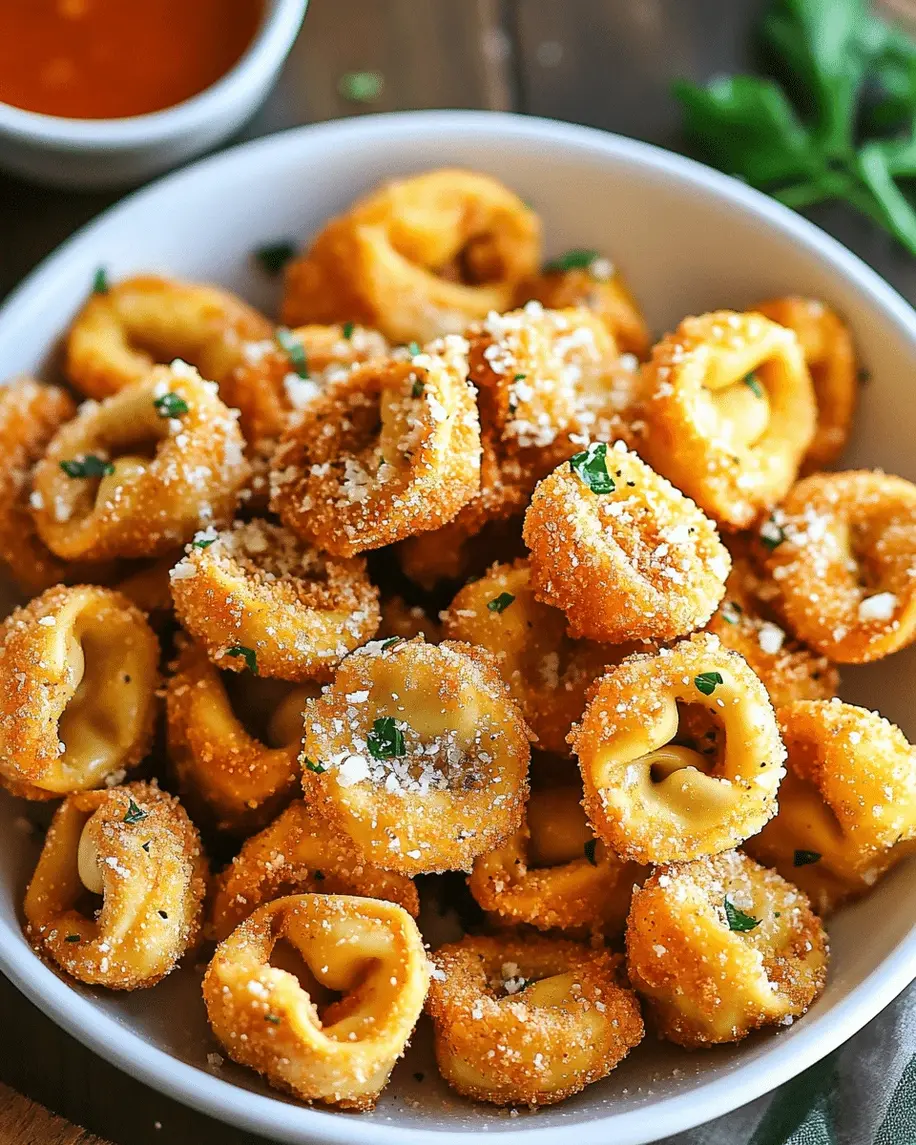
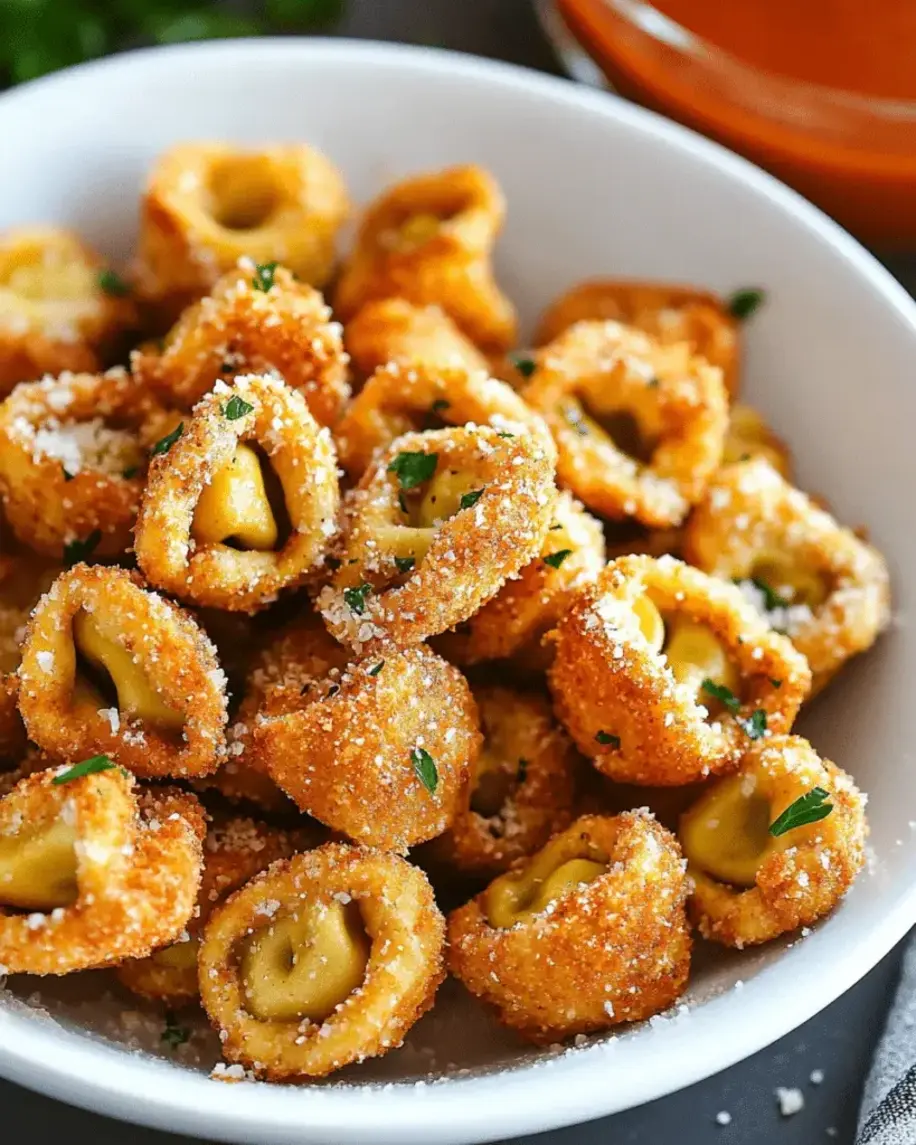
Transfer the hot, crispy tortellini to a plate lined with paper towels to absorb any residual oil. Immediately sprinkle them generously with a bit more grated Parmesan cheese and chopped fresh parsley, if desired. For an extra garlic kick, you could quickly sauté some minced fresh garlic in a tablespoon of olive oil until fragrant, then drizzle it over the tortellini. Serve immediately while they’re at their absolute crispiest!
Nutritional Breakdown: Indulgence with Awareness
While this recipe is all about delicious indulgence, understanding the nutritional profile can help you enjoy it mindfully. The exact values will vary based on the specific tortellini used and the amount of oil absorbed.
- Calories: Approximately 250-350 per serving (depending on serving size and oil absorption)
- Protein: Around 8-12g
- Fat: Variable, primarily from oil and cheese.
- Carbohydrates: Primarily from the tortellini pasta.
Note: This is an estimated nutritional value. For precise information, calculate using your specific ingredients.
Healthier Twists: Lighter Bites, Same Great Flavor
Looking for a lighter version of this crowd-pleaser? You don’t have to sacrifice flavor entirely!
- Air Fryer Method: Toss the tortellini (coated as per the recipe) with a light spray of olive oil and air fry at 375°F (190°C) for 8-10 minutes, shaking halfway through, until golden and crisp. This drastically reduces oil content.
- Baking Method: Toss the coated tortellini with a minimal amount of olive oil and bake on a parchment-lined baking sheet at 400°F (200°C) for 15-20 minutes, flipping halfway, until golden and firm. They won’t be quite as shatteringly crisp as fried, but still delicious!
- Lighter Coating: Experiment with Panko breadcrumbs mixed with Parmesan for an even crispier texture with potentially less oil absorption.
- Reduced Cheese: While cheese is key to flavor, you can slightly reduce the amount in the coating and rely more on herbs and spices.
Elevate Your Experience: Serving Suggestions
These crispy fried tortellini are incredibly versatile:
- As an Appetizer: Serve them warm with your favorite marinara sauce for dipping.
- In Salads: Add a crunchy, savory element to a Caesar salad or a Caprese salad.
- With Pasta: Top a creamy Alfredo or a pesto pasta dish for an extra textural surprise.
- Party Snack: They are perfect for game days, potlucks, or any gathering where delicious, easy-to-eat finger food is a must.
Avoiding Pitfalls: Common Mistakes to Sidestep
Even simple recipes have potential pitfalls. Here’s how to avoid them:
- Overcrowding the Pot: This is the cardinal sin of frying. Stick to small batches to maintain oil temperature and achieve crispiness.
- Oil Not Hot Enough: Leads to greasy, soggy results. Ensure your oil is at the correct temperature before adding tortellini.
- Using Dried Tortellini: They won’t have the same pleasing texture when fried as fresh or refrigerated ones.
- Not Patting Tortellini Dry: Moisture creates steam, which leads to splattering and prevents crisping.
- Frying Too Long: Tortellini can become hard or burnt if overcooked. Keep an eye on them!
Keeping Them Fresh: Storing Your Fried Tortellini
Fried foods are best enjoyed immediately. However, if you have leftovers:
- Cool Completely: Let them cool down to room temperature before storing to prevent condensation from making them soggy.
- Airtight Container: Store in an airtight container at room temperature for up to 24 hours. They will lose some crispness over time.
- Reheating: For best results, reheat in a single layer on a baking sheet in a preheated oven at 350°F (175°C) for 5-8 minutes, or until crispy again. An air fryer also works wonders for reheating. Avoid microwaving, as it will make them soft and chewy.
Frequently Asked Questions
***Is it okay to fry tortellini that has already been boiled?***
While this recipe works best with fresh or refrigerated tortellini, if you have pre-boiled tortellini, you absolutely must ensure they are patted completely dry and are at room temperature. Frying them straight from boiling water will be very messy and may not yield the best crispness. For best results, use them fresh or refrigerated.
***Can I use different types of tortellini?***
Yes! While cheese tortellini is a classic, feel free to experiment with spinach and ricotta, mushroom, or even meat-filled tortellini. The cooking time might vary slightly depending on the size and filling, so keep an eye on them.
***What oil is best for frying tortellini?***
A neutral-flavored oil with a high smoke point is ideal. Vegetable oil, canola oil, or peanut oil are excellent choices. The oil should be heated to around 350°F (175°C).
***Can this recipe be made ahead of time?***
Fried foods are always best served immediately for maximum crispness. However, you can prepare the dry coating mixture ahead of time. While you can store fried tortellini for a short period, they will lose their crispness. Reheating in an oven or air fryer is recommended.
***What serving sauce do you recommend?***
A classic marinara sauce is a perfect dipping companion. You could also try a spicy arrabbiata, a creamy pesto, or even a garlic aioli for a different flavor profile.
Your New Favorite Snack is Just Minutes Away
There you have it – the ultimate guide to creating incredibly crispy, flavorful fried tortellini with garlic and Parmesan. This recipe proves that you don’t need hours in the kitchen to create something truly special. Whether you’re looking for a quick appetizer, a fun party snack, or just a way to elevate your weeknight meal, these golden little bites are sure to be a hit. So, gather your ingredients, heat up that oil, and prepare to be amazed by how simple deliciousness can be. What are you waiting for? Your crispy tortellini adventure begins now!
Loved this recipe? Share your creations with us on social media using #CrispyTortellini and tag us @delicetreats! Don’t forget to leave a comment below and let us know how much you enjoyed them!
Crispy Fried Tortellini Recipe with Garlic and Parmesan: The Ultimate Snack for Any Occasion

Discover the perfect crispy fried tortellini recipe with garlic and Parmesan. A delicious, easy-to-make snack or appetizer!
Ingredients
- 1 quartpeanut oil
- 1 cupall-purpose flour
- 4large eggs, beaten
- 1 cupItalian-style bread crumbs
- 3/4 cupgrated Parmesan cheese
- 3 tablespoonsall-purpose seasoning
- 1 tablespoondried parsley
- 3 tablespoonsgranulated garlic
- 2 teaspoonssalt
- 1 teaspoonpepper
- 1package (20 ounces) chilled tortellini
Instructions
- Heat peanut oil in a large stockpot over medium-high heat until it reaches 350°F.
- In a large bowl, place the all-purpose flour. In a separate bowl, beat the eggs.
- In a zip-top bag, combine the bread crumbs, Parmesan cheese, all-purpose seasoning, parsley, garlic, salt, and pepper.
- Working in batches, place the tortellini in the flour, tossing to coat evenly. Shake off excess flour.
- Dip the coated tortellini into the beaten eggs, ensuring each piece is fully covered.
- Transfer the egg-coated tortellini into the zip-top bag with the seasoned bread crumb mixture. Seal the bag and shake until the tortellini are well-coated.
- Once the oil is hot, carefully place several tortellini into the oil and fry until golden brown and cooked through, about 2-3 minutes per batch.
- Remove the tortellini and place them on a large plate lined with paper towels to drain any excess oil. Sprinkle lightly with salt.
- Repeat with the remaining tortellini.
- Serve immediately. Optionally, serve with marinara sauce for dipping.
- Details: This crispy fried tortellini recipe delivers a perfect balance of crunch, flavor, and cheesy goodness. With a golden-brown exterior and tender interior, these fried tortellinis are a fantastic appetizer or snack. They’re coated in a zesty blend of Parmesan, garlic, and seasoning, making them irresistible.
“`
Leave a Reply