“`html
Table of Contents
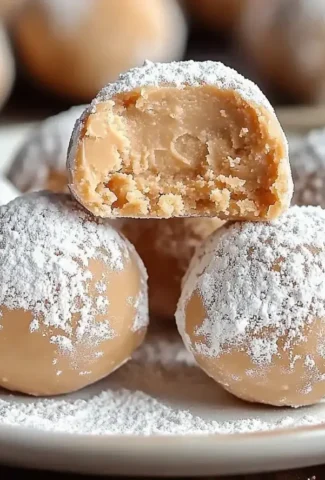
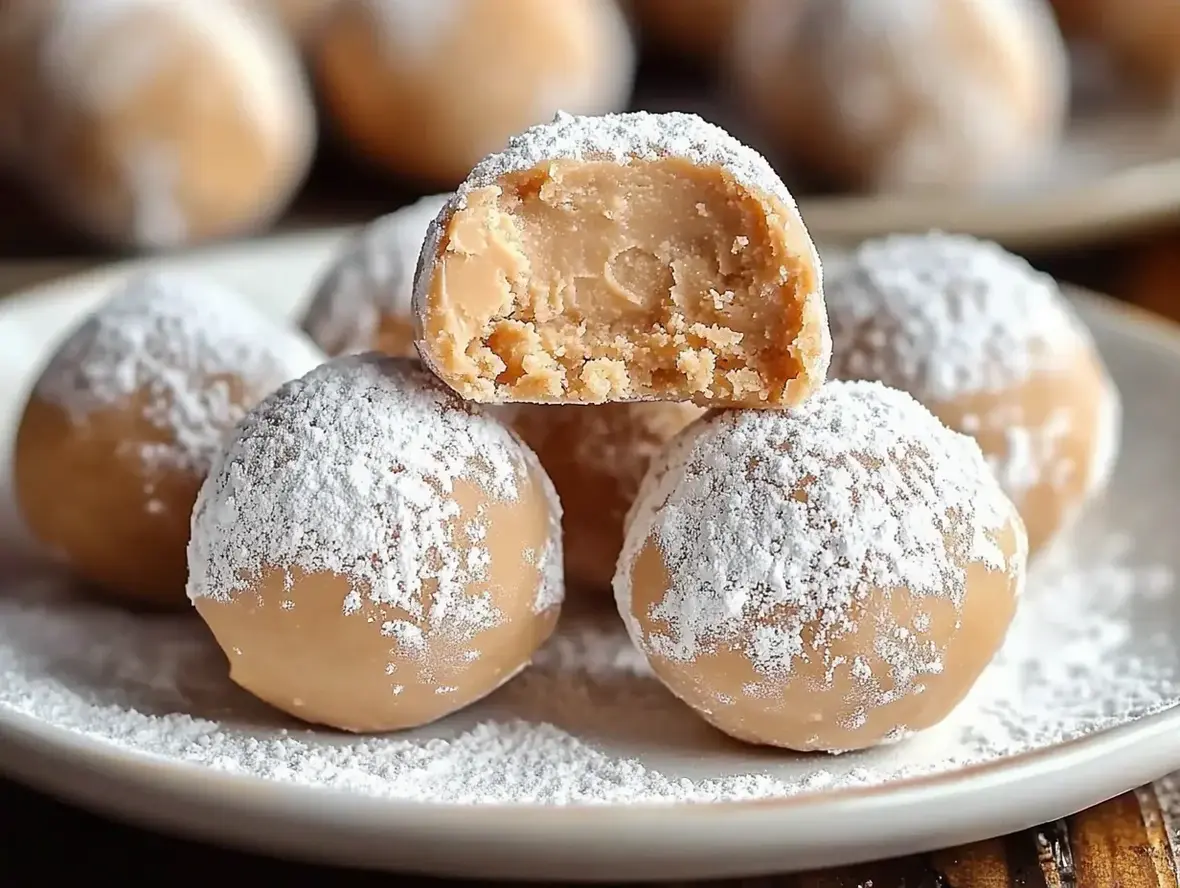
Easy Peanut Butter Balls Recipe with Cream Cheese
Craving a Decadent Treat? Discover the Easiest Peanut Butter Balls with Cream Cheese You’ll Ever Make!
Did you know that over 60% of people admit to having a specific craving for chocolate and peanut butter combinations at least once a week? If you’re one of them, get ready to meet your new obsession: Easy Peanut Butter Balls with Cream Cheese. This isn’t just any sweet treat; it’s a simple, yet incredibly satisfying, concoction that promises a burst of creamy, nutty, chocolatey goodness with every bite. Forget complicated steps and rare ingredients – this recipe is designed for busy bees and novice bakers alike, proving that extraordinary desserts can be made with just a few humble components. Prepare to be amazed by how quickly and effortlessly you can create a dessert that’s perfect for potlucks, holiday gatherings, or simply a delightful afternoon pick-me-up. Let’s dive into the magic of this effortless 3-ingredient wonder!
Ingredients for Creamy Peanut Butter Balls
The beauty of this recipe lies in its simplicity. You likely have most of these in your pantry already!
- Peanut Butter: 1 cup (about 250g). We recommend creamy peanut butter for the smoothest texture, but natural peanut butter also works beautifully, just give it a good stir to combine the oil. The slight saltiness in peanut butter is key to balancing the sweetness.
- Cream Cheese: 4 oz (about 115g), softened. Full-fat cream cheese lends the richest, creamiest texture. Make sure it’s truly softened to room temperature to avoid lumps in your mixture. This is the secret ingredient that elevates these from good to gourmet!
- Powdered Sugar (Icing Sugar): 1 to 1.5 cups (about 120-180g), sifted. Start with 1 cup and add more if needed to reach a firm, rollable consistency. Sifting is crucial to prevent a grainy texture. This adds sweetness and helps bind the ingredients.
- Optional: Chocolate Chips for Melting: 1 cup (about 170g). Semi-sweet or dark chocolate chips work wonderfully for dipping. You can also use a melting chocolate candy bar for a smoother finish.
- Optional: Coconut Oil or Vegetable Oil: 1 teaspoon (for melting chocolate). This helps thin the chocolate for easier dipping and a smoother coating.
- Optional: Sprinkles or Chopped Nuts: For decoration.
Timing Your Peanut Butter Ball Magic
Compared to many no-bake desserts that often require extended chilling or complex steps, these peanut butter balls are exceptionally quick. The hands-on time is minimal, allowing you to whip them up even on a weeknight. The crucial chilling time ensures they hold their shape, making them perfect for last-minute gatherings.
Step-by-Step Guide to Perfect Peanut Butter Balls
Step 1: Gather Your Dream Team
First things first, gather all your ingredients. Ensure your cream cheese is nicely softened. If you’re planning to dip these in chocolate, place your chocolate chips in a microwave-safe bowl along with the teaspoon of oil (if using). This prep ensures a smooth workflow and prevents any last-minute scrambling.
Step 2: The Mix Master
In a medium bowl, combine the creamy peanut butter and the softened cream cheese. Use a sturdy spoon or a spatula to mix them together until they are thoroughly combined and look like a smooth, creamy paste. Don’t be afraid to really work it to get it as uniform as possible. You’re aiming for a luscious base.
Step 3: Rolling in the Dough
Gradually add the sifted powdered sugar to the peanut butter and cream cheese mixture. Start with 1 cup and mix until just combined. The mixture will start to thicken. If it’s still too sticky to roll, add the remaining half cup of powdered sugar, a tablespoon at a time, until the dough is firm enough to handle without sticking excessively to your hands. You want a dough that holds its shape but isn’t dry. Once you’ve achieved the right consistency, use your hands to roll the mixture into small balls, about 1-inch in diameter. Place these on a baking sheet lined with parchment paper.
Pro Tip: If the mixture is too sticky, chilling it for 10-15 minutes in the refrigerator can make it easier to handle and roll.
Step 4: The Chill Out Phase
Once all your balls are rolled, place the baking sheet in the refrigerator for at least 30 minutes. This crucial step firms up the peanut butter balls, making them much easier to dip in chocolate without falling apart. While they’re chilling, you can prepare your chocolate for dipping.
Step 5: The Chocolate Dip Divine
Melt your chocolate chips with the optional teaspoon of oil in the microwave. Heat in 30-second intervals, stirring well after each, until smooth and fully melted. Be careful not to overheat. Remove the chilled peanut butter balls from the refrigerator. Using a fork or a toothpick, dip each ball into the melted chocolate, ensuring it’s fully coated. Gently tap off any excess chocolate. You can place the dipped balls back on the parchment-lined baking sheet. If you’re feeling fancy, sprinkle with chopped nuts or festive sprinkles while the chocolate is still wet. You can optionally place the dipped balls back in the fridge for another 10-15 minutes to set the chocolate.
Nutritional Highlights
While these are a treat, understanding their approximate nutritional profile can be helpful. A typical serving (assuming 2 small balls, without chocolate coating) contains:
- Calories: Approximately 150-200 per serving (this can vary greatly based on size and ingredients used).
- Fat: Primarily from peanut butter and cream cheese.
- Carbohydrates: Mainly from powdered sugar.
- Protein: A small amount from the peanut butter.
Note: These are estimations. For precise nutritional information, it’s best to calculate based on the specific brands and quantities you use. Adding a chocolate coating will increase calorie and sugar content.
Healthier Alternatives
Looking for ways to make these even lighter without sacrificing flavor?
- Reduce Sweetness: Use less powdered sugar, or swap some with a natural sweetener like a touch of maple syrup or honey (though this will alter texture slightly).
- Lower Fat Cream Cheese: Opt for Neufchâtel cheese or a light cream cheese, but be aware this might affect creaminess.
- Whole Wheat or Oat Flour: Instead of powdered sugar, you *could* experiment with a small amount of finely ground whole wheat flour or oat flour to help bind, but this will significantly change the texture and flavor profile.
- Dark Chocolate Coating: Use a high-quality dark chocolate (70% cacao or higher) for dipping, as it has less sugar and more antioxidants. For a lighter coating, consider a melted sugar-free chocolate.
Serving Suggestions
These peanut butter balls are incredibly versatile! They are perfect:
- As a delightful dessert after any meal.
- At holiday cookie exchanges or parties.
- Paired with a glass of milk or a hot cup of coffee.
- As a sweet surprise in a lunchbox (just be mindful of the chocolate melting in warm weather!).
- Arranged on a platter for an impressive yet easy appetizer.
Common Mistakes to Avoid
- Not Softening the Cream Cheese: Lumps, lumps, lumps! Softened cream cheese blends smoothly.
- Over-Mixing After Adding Powdered Sugar: Overworking the dough can make it tough.
- Skipping the Chilling Step: Sticky dough will make rolling and dipping a messy, frustrating experience.
- Overheating Chocolate: Burnt chocolate is not a good look (or taste!). Melt it gently.
- Using Unsalted Peanut Butter Without Adjustment: If using unsalted peanut butter, you might want to add a pinch of salt to the mixture to enhance the flavor.
Storing Tips
These peanut butter balls are best stored in an airtight container in the refrigerator. They will keep well for up to a week. If they are dipped in chocolate, the chocolate coating can sometimes soften at room temperature, especially in warmer climates, so refrigeration is recommended.
Frequently Asked Questions About Peanut Butter Balls
-
***Can I use crunchy peanut butter instead of creamy?***
Yes, you can! Crunchy peanut butter will add a nice texture to the balls. Just be aware that the texture might be slightly different, and you may need to adjust the amount of powdered sugar slightly to get the right consistency.
-
***How do I get a smooth chocolate coating?***
The key is to melt the chocolate gently and not overheat it. Using a teaspoon of oil (like coconut or vegetable oil) also helps to thin the chocolate, making it easier to coat the balls smoothly. Stirring well between microwave intervals is crucial.
-
***Can I freeze these peanut butter balls?***
Yes, you can freeze them! Place them in a single layer on a baking sheet and freeze until solid, then transfer them to an airtight container or freezer bag. They can be frozen for up to 2-3 months. Thaw them in the refrigerator before serving.
-
***Why are my peanut butter balls too soft?***
This usually happens if there isn’t enough powdered sugar, or if the cream cheese wasn’t fully softened and didn’t incorporate evenly. Try adding a little more powdered sugar, a tablespoon at a time, until the mixture is firm enough to roll. Ensure all ingredients are measured correctly.
-
***Can I make these vegan?***
This specific recipe relies on dairy cream cheese, so it cannot be made vegan as written. However, there are many vegan peanut butter ball recipes that use vegan cream cheese alternatives or other binders.
Loved this easy peanut butter balls recipe? Share your creations and tips in the comments below, or tag us on social media! Your feedback helps us create even more delicious recipes for you.
3-Ingredient Peanut Butter Balls
These creamy and indulgent peanut butter balls are incredibly easy to make with just three simple ingredients. Perfect as a no-bake treat for parties or snack time, they offer a delicious balance of nutty, sweet, and tangy flavors!
Ingredients
- 8 ozcream cheese, softened1 cupcreamy peanut butter1 cuppowdered sugar
- 1 cupcreamy peanut butter1 cuppowdered sugar
- 1 cuppowdered sugar
Instructions
- 1️⃣Mix the cream cheese and peanut butter
- In a medium mixing bowl, combine the softened cream cheese and peanut butter.Use a hand mixer or a sturdy spatula to blend until the mixture is smooth and creamy.2️⃣Incorporate the powdered sugarGradually add the powdered sugar to the mixture, stirring well after each addition.Continue mixing until the dough is thick and holds together. If the mixture feels too sticky, add a little more powdered sugar, one tablespoon at a time.3️⃣Shape and chillScoop out small portions of the dough and roll them into 1-inch balls using your hands or a small cookie scoop.Place the formed balls onto a baking sheet lined with parchment paper or wax paper.Refrigerate forat least 30 minutesto firm up before serving.
- Use a hand mixer or a sturdy spatula to blend until the mixture is smooth and creamy.2️⃣Incorporate the powdered sugarGradually add the powdered sugar to the mixture, stirring well after each addition.Continue mixing until the dough is thick and holds together. If the mixture feels too sticky, add a little more powdered sugar, one tablespoon at a time.3️⃣Shape and chillScoop out small portions of the dough and roll them into 1-inch balls using your hands or a small cookie scoop.Place the formed balls onto a baking sheet lined with parchment paper or wax paper.Refrigerate forat least 30 minutesto firm up before serving.
- 2️⃣Incorporate the powdered sugar
- Gradually add the powdered sugar to the mixture, stirring well after each addition.Continue mixing until the dough is thick and holds together. If the mixture feels too sticky, add a little more powdered sugar, one tablespoon at a time.3️⃣Shape and chillScoop out small portions of the dough and roll them into 1-inch balls using your hands or a small cookie scoop.Place the formed balls onto a baking sheet lined with parchment paper or wax paper.Refrigerate forat least 30 minutesto firm up before serving.
- Continue mixing until the dough is thick and holds together. If the mixture feels too sticky, add a little more powdered sugar, one tablespoon at a time.3️⃣Shape and chillScoop out small portions of the dough and roll them into 1-inch balls using your hands or a small cookie scoop.Place the formed balls onto a baking sheet lined with parchment paper or wax paper.Refrigerate forat least 30 minutesto firm up before serving.
- 3️⃣Shape and chill
- Scoop out small portions of the dough and roll them into 1-inch balls using your hands or a small cookie scoop.Place the formed balls onto a baking sheet lined with parchment paper or wax paper.Refrigerate forat least 30 minutesto firm up before serving.
- Place the formed balls onto a baking sheet lined with parchment paper or wax paper.Refrigerate forat least 30 minutesto firm up before serving.
- Refrigerate forat least 30 minutesto firm up before serving.
Notes
Storage: Store the peanut butter balls in an airtight container in the refrigerator for up to1 weekor in the freezer for up to3 months.Serving suggestion: Serve chilled for the best texture, but let them sit at room temperature for a few minutes if they’ve been in the freezer.
Serving suggestion: Serve chilled for the best texture, but let them sit at room temperature for a few minutes if they’ve been in the freezer.
“`
Leave a Reply