“`html
Table of Contents
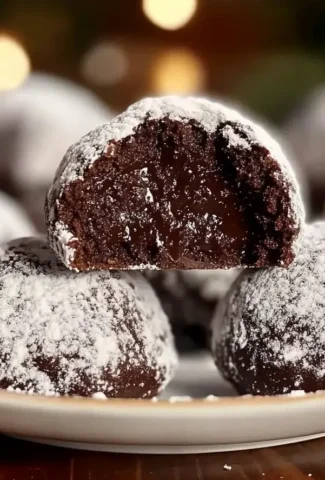
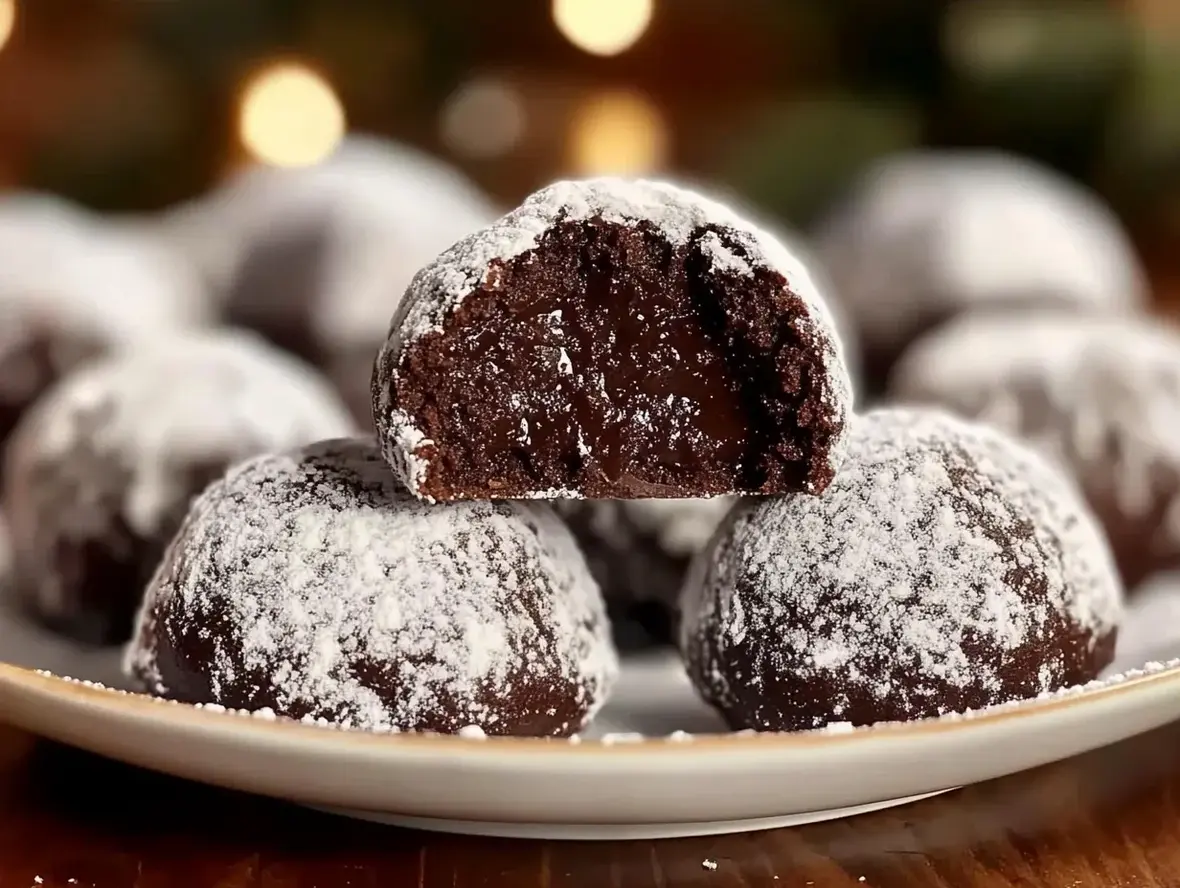
Chocolate Snowball Cookies: Your Go-To Holiday Treat!
Searching for that perfect, melt-in-your-mouth cookie to brighten your holiday season? If you’re nodding along, you’re in the right place! Chocolate snowball cookies, often called Mexican wedding cookies or Russian tea cakes, are a timeless classic for a reason. Their delicate texture, sweet nutty flavor, and generous dusting of powdered sugar make them an irresistible part of any festive spread. But how do you achieve that perfect balance of crisp exterior and tender interior every single time?
An Irresistible Bite of Holiday Cheer
The holiday season is synonymous with a medley of warming spices, rich flavors, and, of course, an abundance of cookies. Among these festive delights, chocolate snowball cookies—also known by many charming names like Mexican wedding cookies or Russian tea cakes—stand out for their elegant simplicity and utterly delightful taste. These cookies are not just a treat; they’re a memory, a tradition, and a hug in cookie form. With their delicate crumb, subtle hint of chocolate and nuts, and a beautiful snowy coating of powdered sugar, they capture the magic of winter in every bite. While they look sophisticated, the secret is out: they are surprisingly easy to make, making them an ideal project for bakers of all skill levels, even those new to holiday baking. They are quick to assemble, bake relatively fast, and the assembly is almost meditative. Get ready to impress your friends, family, and even Santa with these show-stopping, melt-in-your-mouth chocolate snowball cookies.
Gather Your Glistening Ingredients
The magic of these snowball cookies lies in simple, high-quality ingredients. Here’s what you’ll need to create your batch:
- Unsalted Butter: 1 cup (2 sticks), softened to room temperature. Good quality butter is key for flavor and texture. It should yield slightly when pressed.
- Confectioners’ Sugar (Powdered Sugar): 1/2 cup, plus more for rolling. Sifted to ensure a smooth texture and prevent lumps.
- Vanilla Extract: 1 teaspoon. Pure vanilla extract offers the best, most aromatic flavor.
- Egg Yolk: 1 large. This adds richness and helps bind the dough without making the cookies too cakey. Ensure it’s from a fresh egg.
- All-Purpose Flour: 2 1/4 cups, sifted. Sifting helps create a lighter texture. You can substitute half with cake flour for an even more tender cookie.
- Unsweetened Cocoa Powder: 1/4 cup. Use a good quality brand for a deep chocolate flavor.
- Finely Chopped Nuts: 1/2 cup. Pecans or walnuts are traditional and add a lovely crunch and earthy flavor. Toasting them beforehand enhances their nutty aroma and taste. For nut-free, omit or use toasted sunflower seeds.
- Salt: 1/4 teaspoon. Balances the sweetness and enhances the chocolate flavor.
Perfect Timing for Your Holiday Baking
20 minutes
10-12 minutes
30-35 minutes (plus chilling if desired)
Compared to many holiday cookie recipes, chocolate snowball cookies are remarkably quick to prepare. The average cookie recipe might take longer due to more complex steps or extended chilling times. These beauties come together in under an hour from start to finish, leaving you more time to enjoy the festivities!
Crafting Your Chocolate Snowballs — Step-by-Step
Let’s get down to baking these delightful treats!
Step 1: Cream the Butter and Sugar
In a medium bowl, cream together the softened unsalted butter and 1/2 cup of confectioners’ sugar using an electric mixer until light and fluffy. This process incorporates air, which is crucial for a tender cookie texture. Scrape down the sides of the bowl occasionally to ensure everything is well combined.
Step 2: Add Wet Ingredients
Beat in the vanilla extract and the large egg yolk until just combined. Don’t overmix at this stage. The mixture might look a little curdled, but that’s perfectly okay.
Step 3: Combine Dry Ingredients
In a separate bowl, whisk together the sifted all-purpose flour, unsweetened cocoa powder, finely chopped nuts, and salt. This ensures the dry ingredients are evenly distributed, preventing pockets of salt or cocoa.
Step 4: Form the Cookies
Gradually add the dry ingredients to the wet ingredients, mixing on low speed until just combined and a soft dough forms. Avoid overmixing, as this can lead to tough cookies. The dough will be somewhat soft and sticky.
Using a small cookie scoop or a tablespoon, scoop out portions of dough and roll them into neat, 1-inch balls between your palms. If the dough is too sticky, you can chill it for about 15-20 minutes, or lightly flour your hands.
Place the rolled balls onto a baking sheet lined with parchment paper, leaving a little space between them.
Step 5: Bake to Perfection
Preheat your oven to 350°F (175°C). Bake the cookies for 10-12 minutes, or until the edges are set and the centers still look slightly soft. They should not show any browning; we want to maintain their pale, snowy appearance.
Let the cookies cool on the baking sheet for 5 minutes before transferring them to a wire rack to cool completely.
Step 6: The Final Dusting
Once the cookies are completely cool, place a generous amount of confectioners’ sugar in a shallow bowl. Gently roll each cookie in the sugar until fully coated, creating that signature snowball look. For an extra dusting, you can lightly shake more powdered sugar over them once they’re on your serving platter.
Nutritional Snapshot (Approximate Per Cookie)
- Calories: 120-150 kcal
- Fat: 7-9g
- Carbohydrates: 15-18g
- Protein: 1-2g
Please note: These values are approximate and can vary based on specific ingredients and portion sizes.
Healthier Swaps for Lighter Indulgence
While these cookies are a treat, you can make some adjustments for a lighter version without sacrificing too much flavor:
- Flour: Substitute half of the all-purpose flour with whole wheat pastry flour or oat flour for added fiber.
- Sugar: Reduce the amount of confectioners’ sugar in the dough slightly. For rolling, consider a lighter dusting or using coconut sugar for a less refined option (though this will change the appearance).
- Fat: You could try using half the butter and replacing the other half with unsweetened applesauce or a neutral oil like avocado oil, though this might alter the texture slightly.
- Nuts: Toasted sunflower seeds or pumpkin seeds can be used for a nut-free cookie, or simply omit them.
Always remember that moderation is key when enjoying any treat!
Serving Suggestions: How to Best Enjoy Them
Chocolate snowball cookies are incredibly versatile. They are perfect:
- As a delightful accompaniment to coffee or tea during a cozy afternoon break.
- Arranged on a festive holiday platter for cookie exchanges or parties.
- Tucked into holiday gift boxes as a homemade present.
- Paired with a glass of cold milk for a classic, comforting snack.
Common Mistakes to Avoid
- Overmixing the Dough: This develops the gluten in the flour too much, resulting in tough, dense cookies. Mix until just combined.
- Baking Too Long: Snowball cookies should not be browned. Overbaking will make them hard and dry. Watch for set edges and a soft center.
- Rolling While Warm: Always let the cookies cool completely before rolling them in powdered sugar. Warm cookies will melt the sugar into a sticky mess.
- Using Unsoftened Butter: This makes creaming difficult and can lead to an uneven texture in the final cookie.
Storing Your Snowy Delights
Chocolate snowball cookies can be stored in an airtight container at room temperature for up to 5 days. It’s best to place a piece of parchment paper between layers to prevent them from sticking together. They also freeze beautifully! Place them in a freezer-safe container or bag for up to 3 months. Thaw at room temperature. The powdered sugar coating may need a light re-dusting after freezing.
Frequently Asked Questions
***What are chocolate snowball cookies typically called besides that?***
They are popularly known as Mexican wedding cookies, Russian tea cakes, or sometimes snowdrop cookies. The name often depends on regional traditions and slight recipe variations.
***Can I use different nuts or skip them entirely?***
Absolutely! Pecans and walnuts are common, but almonds or even finely chopped hazelnuts work well. For a nut-free version, you can omit them or use finely minced toasted sunflower seeds or pumpkin seeds for a similar texture.
***Why are my cookies so crumbly?***
This can happen if there’s too much flour, not enough fat, or the dough was overmixed. Ensure you measure flour accurately (spoon and level, don’t scoop directly from the bag). Using softened butter and not overworking the dough are key.
***Can I make the dough ahead of time?***
Yes, the dough can be made ahead and refrigerated for up to 2-3 days. If it’s too firm to roll when cold, let it sit at room temperature for about 15-20 minutes until pliable.
***Why aren’t my cookies holding their shape?***
If your cookies are spreading too much, it might be due to warm butter or overmixing. Ensure your butter is softened but not melted, and chill the dough for 20-30 minutes before scooping and baking if you see excessive spreading.
Endless Holiday Joy in Every Bite!
Chocolate snowball cookies are more than just a dessert; they’re a little bit of holiday magic you can bake at home. Their simple elegance, delicate texture, and comforting flavor make them a cherished tradition for many. Whether you’re a seasoned baker or just starting, this recipe is straightforward, rewarding, and guarantees a festive treat that will be loved by all. So, gather your ingredients, put on some holiday tunes, and bake up a batch of these delightful chocolate snowballs. They’re sure to become your go-to holiday treat year after year!
Ready to bake? Grab your apron and follow this guide to create your own batch of perfect chocolate snowball cookies!
Chocolate Snowball Cookies
TheseChocolate Snowball Cookiesare buttery, melt-in-your-mouth treats with a rich cocoa flavor and a snowy powdered sugar coating. Perfect for the holidays or any occasion, these cookies are easy to make and customizable for gluten-free or nut-free diets.
Ingredients
- 1 cupunsalted butter, softened½ cuppowdered sugar (plus extra for rolling)1 teaspoonvanilla extract2 cupsall-purpose flour¼ cupcocoa powder½ teaspoonsalt1 cupfinely chopped nuts (optional, such as pecans or walnuts)
- ½ cuppowdered sugar (plus extra for rolling)1 teaspoonvanilla extract2 cupsall-purpose flour¼ cupcocoa powder½ teaspoonsalt1 cupfinely chopped nuts (optional, such as pecans or walnuts)
- 1 teaspoonvanilla extract2 cupsall-purpose flour¼ cupcocoa powder½ teaspoonsalt1 cupfinely chopped nuts (optional, such as pecans or walnuts)
- 2 cupsall-purpose flour¼ cupcocoa powder½ teaspoonsalt1 cupfinely chopped nuts (optional, such as pecans or walnuts)
- ¼ cupcocoa powder½ teaspoonsalt1 cupfinely chopped nuts (optional, such as pecans or walnuts)
- ½ teaspoonsalt1 cupfinely chopped nuts (optional, such as pecans or walnuts)
- 1 cupfinely chopped nuts (optional, such as pecans or walnuts)
Instructions
- 1️⃣Prepare the Oven and Baking Sheet:Preheat your oven to 350°F (175°C). Line a baking sheet with parchment paper.2️⃣Mix the Dough:In a large mixing bowl, cream the softened butter and powdered sugar together until light and fluffy. Mix in the vanilla extract.3️⃣Add Dry Ingredients:Gradually sift in the flour, cocoa powder, and salt. Mix until the dough is smooth and fully combined.4️⃣Fold in Nuts (Optional):If using nuts, gently fold them into the dough until evenly distributed.5️⃣Shape the Cookies:Roll the dough into 1-inch balls and place them on the prepared baking sheet, leaving about 1 inch of space between each cookie.6️⃣Bake the Cookies:Bake in the preheated oven for 12–15 minutes, or until the edges are set. Allow the cookies to cool on the baking sheet for 5 minutes.7️⃣Add the “Snow” Coating:While the cookies are still warm, roll them in powdered sugar for the first snowy coating. Once cooled, roll them again in powdered sugar for a festive, snowball-like finish.
- 2️⃣Mix the Dough:In a large mixing bowl, cream the softened butter and powdered sugar together until light and fluffy. Mix in the vanilla extract.
- 3️⃣Add Dry Ingredients:Gradually sift in the flour, cocoa powder, and salt. Mix until the dough is smooth and fully combined.4️⃣Fold in Nuts (Optional):If using nuts, gently fold them into the dough until evenly distributed.5️⃣Shape the Cookies:Roll the dough into 1-inch balls and place them on the prepared baking sheet, leaving about 1 inch of space between each cookie.6️⃣Bake the Cookies:Bake in the preheated oven for 12–15 minutes, or until the edges are set. Allow the cookies to cool on the baking sheet for 5 minutes.7️⃣Add the “Snow” Coating:While the cookies are still warm, roll them in powdered sugar for the first snowy coating. Once cooled, roll them again in powdered sugar for a festive, snowball-like finish.
- 4️⃣Fold in Nuts (Optional):If using nuts, gently fold them into the dough until evenly distributed.5️⃣Shape the Cookies:Roll the dough into 1-inch balls and place them on the prepared baking sheet, leaving about 1 inch of space between each cookie.6️⃣Bake the Cookies:Bake in the preheated oven for 12–15 minutes, or until the edges are set. Allow the cookies to cool on the baking sheet for 5 minutes.7️⃣Add the “Snow” Coating:While the cookies are still warm, roll them in powdered sugar for the first snowy coating. Once cooled, roll them again in powdered sugar for a festive, snowball-like finish.
- 5️⃣Shape the Cookies:Roll the dough into 1-inch balls and place them on the prepared baking sheet, leaving about 1 inch of space between each cookie.
- 6️⃣Bake the Cookies:Bake in the preheated oven for 12–15 minutes, or until the edges are set. Allow the cookies to cool on the baking sheet for 5 minutes.7️⃣Add the “Snow” Coating:While the cookies are still warm, roll them in powdered sugar for the first snowy coating. Once cooled, roll them again in powdered sugar for a festive, snowball-like finish.
- 7️⃣Add the “Snow” Coating:While the cookies are still warm, roll them in powdered sugar for the first snowy coating. Once cooled, roll them again in powdered sugar for a festive, snowball-like finish.
Notes
For a festive twist, add a pinch of cinnamon or peppermint extract to the dough.Store the cookies in an airtight container for up to a week or freeze for longer storage.
Store the cookies in an airtight container for up to a week or freeze for longer storage.
“`
Leave a Reply