
“`html
Table of Contents
- Dreaming of a Tangy Twist?
- The Essential Components of Your Pickle Paradise
- Timing is Everything
- Crafting Your Dill Pickle Chex Mix Masterpiece
- Nutritional Spotlight
- Healthier Bites, Same Big Flavor
- Elevate Your Snacking Experience
- Dodging the Pitfalls: Common Mistakes to Avoid
- Keeping the Crunch Alive: Storage Secrets
- Frequently Asked Questions
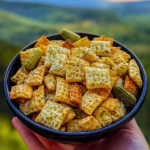
Dill Pickle Chex Mix
Dreaming of a Tangy Twist?
Are you tired of the same old snack mixes? Do you find yourself craving a flavor profile that’s both familiar and excitingly different? If your taste buds are yearning for a zesty, savory, and incredibly addictive crunch, then you’ve landed in the right place! Dill Pickle Chex Mix is not just a snack; it’s an experience. Imagine the satisfying crunch of your favorite cereal squares infused with the unmistakable tangy, briny essence of dill pickles, all coated in a savory, aromatic blend that will have you reaching for more. This isn’t your grandmother’s snack mix (unless she was secretly a pickle genius!). It’s a modern take on a classic, perfect for game nights, movie marathons, or simply elevating your everyday snacking. Forget those dull, bland mixes; get ready to embark on a flavor adventure that’s surprisingly easy to make and impossible to resist.
The Essential Components of Your Pickle Paradise
Creating this sensational Dill Pickle Chex Mix is all about the right combination of textures and tastes. We’re aiming for that perfect balance of savory, tangy, and herbaceous. Here’s what you’ll need:
The Hearty Foundation
- 12 cups assorted Chex cereal: This includes items like Rice Chex, Corn Chex, and Wheat Chex. They provide the essential crunchy base. Feel free to use your favorite combination! For a gluten-free option, stick to Rice and Corn Chex.
- 2 cups pretzel sticks or small pretzels: These add another layer of satisfying crunch and a slightly malty flavor. Goldfish crackers or broken pretzel pieces also work wonderfully.
- 1 cup mixed nuts: A blend of almonds, cashews, pecans, or peanuts adds a delightful richness and heartiness. Ensure they are unsalted unless you prefer a saltier mix.
- 1 cup mixed savory snacks: Think something like Bugles, or even oyster crackers for a delightful textural contrast.
The Tangy Stars
- 1 cup dill pickle juice: The absolute key ingredient! Use the brine from a jar of your favorite dill pickles. For a less intense flavor, you can reduce this slightly. Ensure it’s not sweet pickle brine. You can also use a pickle-flavored seasoning if you can’t get the juice.
- 1/2 cup unsalted butter, melted: This acts as the binder for our delicious coating, ensuring all those wonderful flavors adhere beautifully to the Chex mix.
The Aromatic Enhancers
- 2 tablespoons dill weed (dried): This is where our signature dill flavor comes alive! If you have fresh dill, you’ll need about 1/4 cup chopped, but dried is more concentrated and works perfectly here.
- 1 teaspoon garlic powder: Adds a pungent, savory kick that complements the pickle and dill.
- 1 teaspoon onion powder: Lends a subtle, sweet onion note that rounds out the savory profile.
- 1/2 teaspoon black pepper: For a touch of warmth and depth.
- 1/4 teaspoon cayenne pepper (optional): For a whisper of heat that enhances all the other flavors.
- 1 teaspoon kosher salt (or to taste): Adjust based on the saltiness of your pickle juice and other components. Start with less and add more if needed after tasting.
Timing is Everything
15 minutes
50 minutes
1 hour 5 minutes
Compared to typical snack mixes that can take just 10-20 minutes of active prep and minimal cooking, Dill Pickle Chex Mix requires a bit more patience with its longer baking time. However, the passive baking time means you can do other things while it’s in the oven, making the 1 hour and 5 minutes total time quite manageable.

Crafting Your Dill Pickle Chex Mix Masterpiece
Making this Dill Pickle Chex Mix is a wonderfully tactile and aromatic process. Follow these steps, and you’ll be rewarded with a snack that’s truly special.
Step 1: Preheat Your Oven and Prepare Your Workspace
First things first, let’s get our oven ready to work its magic. Preheat it to 250°F (120°C). This low and slow approach is crucial for drying out the mix and getting it incredibly crispy without burning those delicate cereal pieces. Next, grab two large baking sheets. Line them with parchment paper for easy cleanup – trust me, you’ll thank yourself later! Parchment paper prevents sticking and makes transferring the mix a breeze.
Step 2: The Dry Mix Foundation
Now, let’s build our flavor canvas. In a large bowl, combine your assorted Chex cereals, pretzels, nuts, and any other savory snacks you’re using. Give it a gentle toss to distribute everything evenly. We want a harmonious blend, not a jumbled mess. Think of this as the base layer for all the deliciousness that’s about to come.
Step 3: Crafting the Pickle Elixir
This is where the magic happens. In a separate, medium-sized bowl, whisk together the melted butter and the dill pickle juice. This is your flavor infusion base! Then, stir in the dried dill weed, garlic powder, onion powder, black pepper, and cayenne pepper (if you’re using it). Mix until everything is well combined. The aroma should already be promising a zesty adventure!
Step 4: Infusing the Flavors
Pour the pickle-butter mixture evenly over the dry ingredients in the large bowl. Using a large spoon or spatula, gently toss everything together until all the cereal, pretzels, and nuts are thoroughly coated. Be patient here; you want every piece to get a good layer of that tangy seasoning. It might look a little saucy at first, but that’s exactly what we want for maximum flavor absorption.
Step 5: Baking to Golden & Crunchy Perfection
Spread the coated mixture evenly in a single layer across your prepared baking sheets. Don’t overcrowd the pans; this allows the air to circulate and the mix to dry out properly. Place the baking sheets in your preheated oven. Bake for 50 minutes, stirring gently every 15 minutes. This regular stirring is key to ensuring uniform crispness and coating. You’ll know it’s ready when it smells amazing and looks lightly golden and feels dry to the touch.
Step 6: Cooling Down for Maximum Crunch
Once baked to perfection, remove the baking sheets from the oven. Let the Dill Pickle Chex Mix cool completely on the baking sheets. This is a crucial step! As it cools, it will continue to crisp up beautifully. Resist the urge to dig in right away; patience here will be rewarded with the ultimate crunchy texture. Once fully cooled, you can stir in the kosher salt to taste, or adjust other seasonings if you feel it needs a little something extra.
Nutritional Spotlight
While exact nutritional values can vary based on the specific brands and types of ingredients used (especially the pickle juice and nuts), here’s a general idea of what you might find per serving (approximately 1 cup):
- Calories: 200-250
- Protein: 4-6g
- Fat: 10-15g (depending on nuts and butter)
- Carbohydrates: 25-30g
- Sodium: Varies significantly based on pickle brine and added salt.
Note: This is an estimation. For precise figures, calculate based on your specific ingredients.
Healthier Bites, Same Big Flavor
Looking to lighten up this tangy treat? You can absolutely make some smart swaps without sacrificing that iconic dill pickle flavor:
- Reduced-Fat Butter/Oil: Opt for a lighter butter option or even a neutral oil like avocado oil, though the flavor profile will shift slightly. A little goes a long way for binding.
- Air Fryer Method: Instead of oven baking, you can try air frying at a lower temperature (around 285-300°F or 140-150°C), tossing frequently, to potentially reduce oil needs.
- Lower Sodium Ingredients: Choose low-sodium pretzels and nuts, and be mindful of the salt in your pickle brine. You might not need to add extra salt.
- Add Veggies: Incorporate dried vegetable flakes like dehydrated bell peppers or onions for added nutrients and flavor without extra fat.
Elevate Your Snacking Experience
This Dill Pickle Chex Mix is incredibly versatile. Here are some ideas:
- Game Day Go-To: The perfect savory snack to munch on while watching the big game.
- Movie Night Companion: Elevate your popcorn with a bowl of this tangy, crunchy goodness.
- Picnic Perfect: Pack it in a sealed container for a delightful addition to your outdoor adventures.
- Party Platter Star: Serve it alongside dips and other finger foods for a crowd-pleasing appetizer.
- Lunchbox Surprise: Add a small portion to a lunchbox for an exciting textural and flavor contrast.
Dodging the Pitfalls: Common Mistakes to Avoid
To ensure your Dill Pickle Chex Mix is a smashing success, steer clear of these common blunders:
- Overcrowding the Baking Sheets: This leads to steaming rather than drying, resulting in a soggy, rather than crispy, mix. Spread it out!
- Too High Oven Temperature: Baking at too high a heat can burn the finer bits, like pretzel pieces, before the larger cereal components are properly dried and crisp. Patience with low heat is key.
- Not Stirring Enough: Skipping the intermediate stirring means uneven toasting and crisping. Make sure to give it a good toss every 15 minutes.
- Adding Liquid Too Quickly: If the pickle juice mixture is too hot, it can prematurely soften some of the ingredients. Ensure butter is melted but not boiling hot when combining.
- Not Cooling Completely: Trying to store or season the mix while it’s still warm will result in a stale, clumpy mess. Let it cool *completely*.
Keeping the Crunch Alive: Storage Secrets
The enemy of any good snack mix is moisture. To keep your Dill Pickle Chex Mix wonderfully crunchy:
- Airtight Containers are Your Best Friend: Once completely cooled, store the mix in an airtight container at room temperature.
- Avoid Humid Environments: Don’t store it in the refrigerator or near a steamy dishwasher, as this can introduce moisture.
- Portion Control: If you anticipate it lasting more than a week, consider storing it in smaller, sealed bags within a larger container to minimize air exposure each time you open it.
- Shelf Life: Properly stored, this snack mix should stay delightfully crunchy for about 1 to 2 weeks.
Frequently Asked Questions
***What kind of pickles should I use for the brine?***
Generally, any dill pickle will work. However, a good quality, crunchy dill pickle will provide the best flavor. Avoid sweet pickles or bread-and-butter pickles, as their sweetness will clash with the savory profile we’re aiming for. Look for jars that are labeled “dill pickles” or “kosher dill pickles.”
***Can I make this gluten-free?***
Yes! You can easily make this gluten-free by ensuring you use gluten-free Chex cereals (like Rice Chex and Corn Chex) and by making sure your pretzels are certified gluten-free. Most nuts and seasonings are naturally gluten-free, but always double-check labels for cross-contamination concerns.
***My mix tastes a little bland. What can I do?***
If your mix lacks punch after cooling, you have a few options. Try adding a little more salt, a touch more dried dill, or even a sprinkle of dill pickle seasoning if you have it. Sometimes, a tiny pinch of extra garlic or onion powder can amplify the savory notes. You can also do a quick toss with a little more pickle juice and bake for another 5-10 minutes. Remember to taste and adjust cautiously!
***Can I use fresh dill instead of dried?***
You can! However, fresh dill is much milder than dried. You’ll need to use approximately six times the amount – so about 1/4 cup of freshly chopped dill for every tablespoon of dried dill. Keep in mind that fresh herbs can sometimes add a bit more moisture, so you might need a slightly longer drying time in the oven.
***How do I get a stronger pickle flavor?***
To intensify the pickle flavor, you can reduce the amount of butter slightly and increase the pickle juice. Alternatively, consider adding a good pinch of pickle seasoning or dill pickle powder to the dry spice blend. Ensure you are using pickle brine that has a robust dill flavor to begin with.
Taste the Tangy Difference!
Dill Pickle Chex Mix is more than just a snack; it’s a flavor explosion that satisfies that craving for something uniquely savory and tangy. With its irresistible crunch and bold taste, it’s sure to become a favorite for parties, movie nights, or any time you need a delicious pick-me-up. Don’t be surprised if it disappears faster than you can say “pickle me impressed!” Give this recipe a try and prepare for a whole new level of snacking satisfaction. Happy snacking!
Dill Pickle Chex Mix
ThisDill Pickle Chex Mixis a tangy, crunchy snack bursting with bold dill pickle flavor! With a mix of Chex cereal, pretzels, cheese crackers, and a zesty seasoning blend, it’s the perfect treat for game nights, parties, or anytime snacking. Simple to make and completely addictive, this recipe will be a hit with pickle lovers!
Ingredients
- 3 cupsRice Chex cereal
- 3 cupsCorn Chex cereal
- 2 cupsmini pretzels
- 2 cupscheese crackers (like Cheez-Its)
- 1/4 cupunsalted butter, melted
- 1/4 cupdill pickle juice
- 1packet (1 oz) ranch seasoning mix
- 1 tablespoondried dill weed
- 1 teaspoongarlic powder
- Optional: Small dill pickle chips or spears for garnish
Instructions
- Preheat the oven to250°F (120°C)and line a large baking sheet with parchment paper.
- In a large mixing bowl, combineRice Chex,Corn Chex,mini pretzels, andcheese crackers. Stir to mix.
- In a separate bowl, whisk togethermelted butter,dill pickle juice,ranch seasoning mix,dried dill weed, andgarlic powder.
- Pour the butter mixture over the Chex mix, stirring gently to coat everything evenly.
- Spread the mix evenly onto the prepared baking sheet in a single layer.
- Bake for45-50 minutes, stirring every 15 minutes, until the mix is golden and crispy.
- Remove from the oven and let cool completely. If desired, toss in small dill pickle chips or spears for extra flavor.
- Serve immediately or store in an airtight container for up to 1 week.
Notes
For an extra punch of dill flavor, add 1 teaspoon more of dried dill weed.
To add a little heat, sprinkle in 1/4 teaspoon cayenne pepper before baking.
This snack mix can be stored at room temperature for up to 1 week or frozen for up to 1 month.
“`
Leave a Reply