“`html
Table of Contents
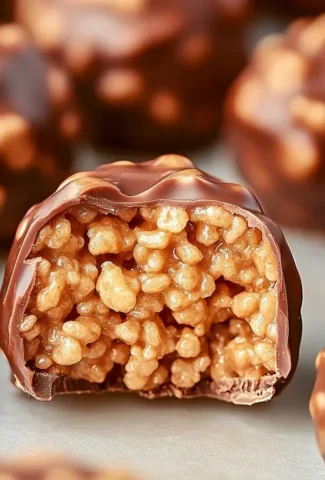
Easy Rice Krispie Peanut Butter Balls Recipe
Craving a Quick and Irresistible Snack?
Are you on the hunt for a universally loved, no-bake treat that’s perfect for any occasion? The search ends here! Rice Krispie Peanut Butter Balls are the ultimate crowd-pleaser, guaranteed to delight taste buds at parties, as a daily snack, or even during the festive holiday season. This easy recipe masterfully blends the creamy, nutty allure of peanut butter with the satisfying crunch of Rice Krispies, all handsomely dressed in a layer of luscious chocolate. Get ready to impress your guests with these delightful spheres of joy. They are so simple to make, you’ll wonder why you haven’t tried them sooner!
The Symphony of Flavors: Ingredients
Crafting these delightful balls is all about balancing texture and taste. Here’s what you’ll need to create this harmonious treat:
- Peanut Butter: 1 cup – creamy or crunchy, your choice! For an ultra-smooth texture, opt for creamy. If you love that extra bit of nutty chew, crunchy is fantastic. It provides the rich, savory base for our treat. (Substitution: Almond butter or cashew butter for a different nutty profile.)
- Butter: 1/2 cup (1 stick) – unsalted, melted. Butter is crucial for binding and adding a subtle richness. It helps achieve that perfect chewy consistency. (Substitution: Coconut oil for a dairy-free option, though it may slightly alter the flavor.)
- Powdered Sugar: 3 cups – sifted. This provides the sweetness and structure, creating that classic no-bake cookie dough-like texture. Sifting prevents lumps and ensures a smooth finish. (Substitution: Maple syrup or agave nectar – use less and be prepared for a softer texture; you may need more Rice Krispies.)
- Rice Krispies Cereal: 6 cups – the star crisper! These iconic puffed rice cereal pieces provide the essential texture and crunch that makes these balls so addictive. (Substitution: Other crispy rice cereals or puffed wheat for variety.)
- Chocolate Chips: 1 cup – semi-sweet or milk chocolate for coating. These melt into a glossy, decadent coating that perfectly complements the peanut butter and crispy interior. (Substitution: Dark chocolate or white chocolate chips for a different flavor profile.)
- Vegetable Shortening or Coconut Oil: 2 tablespoons (optional, for thinning chocolate) – This helps ensure your chocolate coating is smooth and easy to dip or drizzle.
Timing is Everything
One of the best aspects of these Rice Krispie Peanut Butter Balls is how quickly they come together. Compared to many baking recipes that require hours of chilling or oven time, this no-bake marvel is a true time-saver.
15 minutes
30 minutes
45 minutes
This is significantly faster than the average cookie or cake, making it ideal for last-minute guests or when a sweet craving strikes!

Crafting Your Peanut Butter Bliss: Step-by-Step
Let’s get started! Follow these simple steps to create your irresistible treats.
Step 1: Prepare the Peanut Butter Base
In a large mixing bowl, combine the melted butter and peanut butter. Stir them together until they are smooth and well incorporated. This creamy mixture will form the decadent foundation of your balls.
Step 2: Incorporate the Crispies
Gradually add the sifted powdered sugar to the peanut butter mixture, stirring until fully combined. It will start to form a dough. Then, gently fold in the Rice Krispies cereal. Mix until the cereal is evenly coated. Be careful not to overmix, as this can crush the cereal and affect the texture.
Step 3: Form the Balls
Grease your hands lightly with butter or cooking spray to prevent sticking. Take about 1-2 tablespoons of the mixture and roll it between your palms to form smooth balls. Place the formed balls onto a parchment-lined baking sheet or plate. Continue until all the mixture is used.
Step 4: Melt and Drizzle the Chocolate
In a microwave-safe bowl, combine the chocolate chips with the optional vegetable shortening or coconut oil. Microwave in 30-second intervals, stirring in between, until completely melted and smooth. Alternatively, you can use a double boiler. Once melted, you can either dip each peanut butter ball into the chocolate or drizzle the chocolate over the balls using a spoon or fork. Ensure at least half to two-thirds of each ball is coated.
Step 5: Chill and Serve
Place the baking sheet with the chocolate-coated balls into the refrigerator for at least 30 minutes, or until the chocolate has set. This chilling step is crucial for the chocolate to harden and hold its shape. Once set, your delicious Rice Krispie Peanut Butter Balls are ready to be enjoyed!
A Glimpse at the Goodness: Nutritional Info
While these are a treat, understanding their composition can be helpful. (Note: Nutritional values are approximate and can vary based on specific ingredients used.)
- Calories: Approximately 150-200 per ball (depending on size and chocolate coating amount)
- Fat: Around 8-12g
- Carbohydrates: Around 15-20g
- Protein: Around 3-5g
- Sugar: Around 10-15g
Smarter Swaps for a Healthier Bite
Looking to make these even more wholesome without sacrificing flavor? Here are some delicious alternatives:
- Peanut Butter: Opt for natural peanut butter with no added sugar or oils.
- Sweetener: Reduce the powdered sugar and incorporate a natural liquid sweetener like honey or maple syrup. You might need to adjust the Rice Krispies amount.
- Chocolate Coating: Use dark chocolate with a higher cocoa content, which is richer in antioxidants. Alternatively, consider a lighter drizzle or omitting the coating altogether.
- Cereal: Look for whole-grain puffed cereals or those with less added sugar.
Serving Suggestions That Shine
These balls are incredibly versatile. Serve them:
- As a delightful dessert after any meal.
- In lunchboxes for a sweet surprise.
- At parties, potlucks, and bake sales – they’re always a hit!
- Paired with a glass of cold milk or a warm cup of coffee.
- As a quick energy boost during a busy day.
Avoid These Pitfalls: Common Mistakes
To ensure perfect Rice Krispie Peanut Butter Balls every time, keep an eye out for these common errors:
- Overmixing: This can turn your crispies into mush. Mix just until combined.
- Not Greasing Hands: The mixture can be sticky! Greasing your hands makes rolling much easier.
- Not Letting Chocolate Set: Patience is key! Ensure the chocolate is fully hardened before moving or serving to avoid a melty mess.
- Using Stale Cereal: Opt for fresh Rice Krispies for the best crunch.
Keeping Them Fresh: Storing Your Treats
Store your Rice Krispie Peanut Butter Balls in an airtight container at room temperature for up to 3-4 days. If your kitchen is particularly warm, or if you used a dairy-free butter substitute, storing them in the refrigerator can help maintain their shape and prevent softening. To prevent them from sticking together, you can place parchment paper between layers.
The Sweet Verdict
Easy Rice Krispie Peanut Butter Balls are more than just a recipe; they’re a pathway to instant happiness. With their perfect combination of creamy peanut butter, satisfying crunch, and sweet chocolate, they’re a treat that appeals to all ages. Whether you’re a seasoned baker or a complete beginner, this recipe is foolproof and incredibly rewarding. Whip up a batch today and share the joy – or keep them all to yourself, we won’t judge!
Frequently Asked Questions (FAQs)
**Can I use crunchy peanut butter?**
Absolutely! Crunchy peanut butter will add extra texture and peanut chunks to your balls, which many people love.
**How do I get a smooth chocolate coating?**
Ensure your chocolate chips are good quality and melt them slowly, stirring frequently. Adding a little shortening or coconut oil (as suggested) also helps achieve a smoother, glossier finish.
**Can I make these dairy-free?**
Yes! Use vegan butter or coconut oil instead of butter, and opt for dairy-free chocolate chips. Ensure your peanut butter and cereal are also dairy-free.
**What if my mixture is too dry or too crumbly?**
If the mixture feels too dry and won’t hold together, you can try adding a tablespoon of melted butter or peanut butter at a time until it becomes pliable enough to roll.
**Can I freeze these?**
Yes, you can freeze them! Store them in an airtight container in the freezer for up to 1-2 months. Let them thaw at room temperature for about 15-20 minutes before enjoying.
Peanut Butter Balls with Rice Krispies

These delightful no-bake treats combine creamy peanut butter, crunchy Rice Krispies, and rich chocolate for a bite-sized dessert that’s perfect for any occasion. Easy to make and even easier to enjoy!
Ingredients
- 1 cuppeanut butter (creamy or crunchy)1/4 cupbutter, softened1 cuppowdered sugar2 cupsRice Krispies cereal, slightly crushed2 cupssemi-sweet chocolate chips2 tablespoonsvegetable shortening
- 1/4 cupbutter, softened1 cuppowdered sugar2 cupsRice Krispies cereal, slightly crushed2 cupssemi-sweet chocolate chips2 tablespoonsvegetable shortening
- 1 cuppowdered sugar2 cupsRice Krispies cereal, slightly crushed2 cupssemi-sweet chocolate chips2 tablespoonsvegetable shortening
- 2 cupsRice Krispies cereal, slightly crushed2 cupssemi-sweet chocolate chips2 tablespoonsvegetable shortening
- 2 cupssemi-sweet chocolate chips2 tablespoonsvegetable shortening
- 2 tablespoonsvegetable shortening
Instructions
- 1️⃣Prepare a baking sheet: Line a cookie sheet with parchment paper or wax paper to prevent sticking.
- 2️⃣Mix the base ingredients: In a large mixing bowl, cream together the peanut butter, softened butter, and powdered sugar until smooth. Fold in the slightly crushed Rice Krispies cereal and mix until evenly combined.3️⃣Shape the balls: Scoop out small portions of the mixture and roll them into bite-sized balls (about 1 inch in diameter). Place them on the prepared cookie sheet. Chill in the refrigerator for at least 30 minutes to firm up.4️⃣Melt the chocolate: In a large microwave-safe bowl, combine the chocolate chips and vegetable shortening. Heat for 1 minute, then stir. Continue heating in 20–30-second intervals, stirring after each, until the chocolate is mostly melted. Stir until smooth and glossy.5️⃣Dip the peanut butter balls: Using a fork or a dipping tool, coat each peanut butter ball in the melted chocolate. Tap off any excess chocolate and place the dipped balls back onto the lined cookie sheet.6️⃣Set the chocolate: Allow the chocolate coating to firm up at room temperature. For faster results, place the tray in the refrigerator for about 15–20 minutes.7️⃣Store: Transfer the finished peanut butter balls to an airtight container. Store them in the refrigerator for up to 1 week or freeze for longer storage (up to 3 months).
- 3️⃣Shape the balls: Scoop out small portions of the mixture and roll them into bite-sized balls (about 1 inch in diameter). Place them on the prepared cookie sheet. Chill in the refrigerator for at least 30 minutes to firm up.4️⃣Melt the chocolate: In a large microwave-safe bowl, combine the chocolate chips and vegetable shortening. Heat for 1 minute, then stir. Continue heating in 20–30-second intervals, stirring after each, until the chocolate is mostly melted. Stir until smooth and glossy.5️⃣Dip the peanut butter balls: Using a fork or a dipping tool, coat each peanut butter ball in the melted chocolate. Tap off any excess chocolate and place the dipped balls back onto the lined cookie sheet.6️⃣Set the chocolate: Allow the chocolate coating to firm up at room temperature. For faster results, place the tray in the refrigerator for about 15–20 minutes.7️⃣Store: Transfer the finished peanut butter balls to an airtight container. Store them in the refrigerator for up to 1 week or freeze for longer storage (up to 3 months).
- 4️⃣Melt the chocolate: In a large microwave-safe bowl, combine the chocolate chips and vegetable shortening. Heat for 1 minute, then stir. Continue heating in 20–30-second intervals, stirring after each, until the chocolate is mostly melted. Stir until smooth and glossy.
- 5️⃣Dip the peanut butter balls: Using a fork or a dipping tool, coat each peanut butter ball in the melted chocolate. Tap off any excess chocolate and place the dipped balls back onto the lined cookie sheet.6️⃣Set the chocolate: Allow the chocolate coating to firm up at room temperature. For faster results, place the tray in the refrigerator for about 15–20 minutes.7️⃣Store: Transfer the finished peanut butter balls to an airtight container. Store them in the refrigerator for up to 1 week or freeze for longer storage (up to 3 months).
- 6️⃣Set the chocolate: Allow the chocolate coating to firm up at room temperature. For faster results, place the tray in the refrigerator for about 15–20 minutes.7️⃣Store: Transfer the finished peanut butter balls to an airtight container. Store them in the refrigerator for up to 1 week or freeze for longer storage (up to 3 months).
- 7️⃣Store: Transfer the finished peanut butter balls to an airtight container. Store them in the refrigerator for up to 1 week or freeze for longer storage (up to 3 months).
Notes
Crush with care: Lightly crush the Rice Krispies to maintain some crunch without turning them into powder.Chocolate tips: Vegetable shortening helps the chocolate stay smooth and glossy, but you can substitute coconut oil if desired.Decorate: Add a drizzle of white chocolate or sprinkle crushed nuts on top before the chocolate sets for an extra touch.
Chocolate tips: Vegetable shortening helps the chocolate stay smooth and glossy, but you can substitute coconut oil if desired.Decorate: Add a drizzle of white chocolate or sprinkle crushed nuts on top before the chocolate sets for an extra touch.
Decorate: Add a drizzle of white chocolate or sprinkle crushed nuts on top before the chocolate sets for an extra touch.
“`
Leave a Reply