“`html
Table of Contents
- Holiday Peppermint White Chocolate Crackers Made Easy!
- Why You’ll Love This Recipe
- Ingredients You’ll Need
- Timing is Everything
- Step-by-Step Instructions
- Nutritional Information (Per Serving)
- Healthier Alternatives and Swaps
- Serving Suggestions
- Common Mistakes to Avoid
- Storing Your Peppermint Crackers
- Frequently Asked Questions (FAQs)
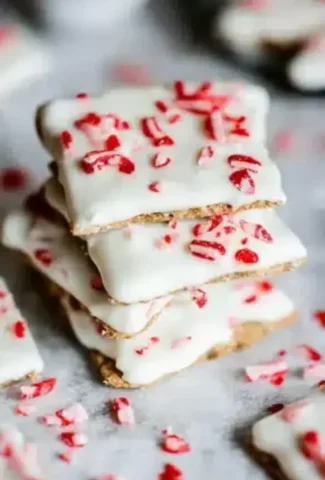
Holiday Peppermint White Chocolate Crackers Made Easy!
Looking for that perfect festive treat that’s as delightful to make as it is to eat? If you’re wondering how to add a burst of holiday cheer to your kitchen without spending hours on complicated desserts, you’ve come to the right place! Our Peppermint Crunch Graham Crackers are the answer, transforming simple ingredients into a dazzling holiday confection. With the holidays just around the corner, having easy-peasy recipes that still pack a flavorful punch is key. These crackers are not only incredibly simple but also wonderfully customizable and make for perfect edible gifts. Let’s dive into creating some magic!
Why You’ll Love This Recipe 🌟
These aren’t just any crackers; they are a miniature masterpiece of festive flavors and textures. Imagine the warm, comforting crunch of a graham cracker, generously coated in smooth, creamy white chocolate, and then adorned with festive pops of crushed candy canes. It’s a symphony of sweet, minty, and chocolatey notes that screams holidays! What makes this recipe a true winner is its sheer simplicity. It’s perfect for getting kids involved in the kitchen, a last-minute dessert for a holiday gathering, or even a charming homemade gift that people will genuinely appreciate. Plus, the cleanup is minimal, which is always a huge bonus during the busy holiday season!
Ingredients You’ll Need 🎄
Gather these simple, delightful ingredients, and let’s get started on your holiday baking adventure!
- Graham Crackers: The humble heroes! Choose full sheets or traditional rectangles. Their slightly sweet, honeyed flavor is the perfect canvas. If you can’t find graham crackers, digestive biscuits or even vanilla wafers can be used as a substitute, offering a slightly different but equally delicious base.
- White Chocolate Chips or Bar: For melting. Using good quality white chocolate (couverture is best if you can get it, but good baking chips work wonders) ensures a smooth, creamy finish. Look for white chocolate that contains cocoa butter for the best melting and flavor. If you prefer a less sweet option, you can blend white chocolate with a small amount of dark chocolate or use a higher-quality premium white chocolate.
- Crushed Candy Canes: The stars of the festive show! Look for classic red and white peppermint candy canes. The crunchy texture and invigorating mint flavor are essential. Provide a sensory experience with their sharp, refreshing aroma and delightful snap. You can purchase pre-crushed candy cane pieces or crush them yourself by placing them in a sealed bag and gently tapping with a rolling pin or mallet.
- Optional: A pinch of sea salt: A few flaky sea salt crystals sprinkled on top can enhance the sweetness and add a sophisticated touch, balancing the sweetness of the chocolate and candy canes.
Timing is Everything ⏱️
One of the best things about this recipe is how quickly it comes together. Say goodbye to recipes that take all day!
Compare that to many traditional holiday cookies that can take hours from mixing to baking to cooling, and you can see why this is a lifesaver on those busy festive days. It’s a speedy way to get a gourmet-looking treat without the time commitment.

Step 1: Prep Your Station
First things first, let’s get organized! Line a baking sheet with parchment paper or a silicone baking mat. This is crucial for easy removal and prevents our delightful crackers from sticking. Next, take your candy canes and crush them. You can do this by placing them in a sturdy zip-top bag and using a rolling pin, the flat side of a meat mallet, or even a heavy pan. Aim for a mix of fine dust and small crunchy pieces – the texture contrast is wonderful! Set aside.
Step 2: Melt the Chocolate
Now for the creamy magic! There are two primary methods for melting white chocolate smoothly: the double boiler method or the microwave method. For the double boiler, place your white chocolate in a heatproof bowl set over a saucepan of simmering water (the water should not touch the bottom of the bowl). Stir gently and constantly until the chocolate is almost completely melted. Remove from heat and stir until smooth, as the residual heat will finish the job. If using the microwave, place the chocolate in a microwave-safe bowl and heat in 30-second intervals, stirring well after each interval, until melted and smooth. Be very careful not to overheat or scorch white chocolate, as it can seize up easily.
Step 3: Coat the Crackers
Once your white chocolate is luxuriously smooth, it’s time to coat the graham crackers. You can do this in a couple of ways for different looks. For a fully dipped cracker, use a fork or a small spatula to spread the melted white chocolate evenly over one side of each graham cracker, ensuring full coverage. For a more artistic drizzle effect, you can place the melted chocolate in a piping bag (or a zip-top bag with the corner snipped off) and drizzle it over the crackers. Alternatively, you can lay crackers flat and spoon a generous amount of chocolate onto each, spreading it out.
Step 4: Add the Peppermint Crunch
Before the white chocolate has a chance to set, generously sprinkle your crushed candy canes over the chocolate-coated crackers. Don’t be shy! The more candy cane, the more festive crunch and minty flavor. Press them down gently into the chocolate so they adhere well. If you’re using flaky sea salt, sprinkle a few crystals over the top now, too. This is where the transformation from simple to spectacular happens!
Step 5: Let Them Set
Now, patience is key (but not for long!). Carefully transfer the prepared crackers back to your lined baking sheet. Place the baking sheet in the refrigerator for about 20-30 minutes, or until the white chocolate is completely firm and set. You can also leave them at cool room temperature if your kitchen isn’t too warm, but the fridge speeds things up considerably.
Step 6: Break and Enjoy!
Once fully set, gently peel the crackers off the parchment paper. If you coated whole sheets or larger sections, you can break them into smaller, more manageable pieces along the natural cracker lines, or even into fun, irregular shapes. This adds to the rustic charm and makes them perfect for snacking or a holiday candy board. Serve them up and watch them disappear!
Nutritional Information (Per Serving)
This is an approximate nutritional breakdown. Actual values may vary based on specific ingredients and serving sizes. This recipe yields approximately 12 servings, with one cracker considered a serving.
- Calories: ~150-200 kcal
- Fat: ~9-12g (Saturated Fat: ~6-8g)
- Carbohydrates: ~18-25g (Sugars: ~15-20g)
- Protein: ~1-2g
- Fiber: ~0.5-1g
Healthier Alternatives and Swaps
Want to enjoy these festive treats with a slightly lighter touch? You can certainly adapt this recipe:
- Use Dark or Milk Chocolate: Swap white chocolate for dark or milk chocolate for a richer flavor profile and potentially less added sugar. Dark chocolate (70% cocoa or higher) offers antioxidants.
- Sugar-Free White Chocolate: Opt for sugar-free white chocolate chips if you’re managing sugar intake.
- Healthier Cracker Base: Consider whole wheat graham crackers or even rice cakes for a lighter, gluten-free base.
- Reduce Candy Cane: Use less crushed candy cane or sprinkle it more sparingly.
- Focus on Texture: Instead of candy canes, try a sprinkle of chopped nuts (like pistachios for color!) or unsweetened shredded coconut for crunch and flavor without the added sugar.
Serving Suggestions
These delightful crackers are incredibly versatile:
- Holiday Parties: Arrange them on a festive platter alongside other holiday cookies and treats.
- Edible Gifts: Package them in clear cellophane bags tied with a festive ribbon. They make beautiful and thoughtful homemade gifts for teachers, neighbors, or colleagues.
- Hot Cocoa Topping: Break into smaller pieces and use as a festive stir-in for hot chocolate.
- Dessert Charcuterie: Add them to a dessert board with fruits, cheeses, and other sweets.
Common Mistakes to Avoid
Keep these tips in mind to ensure your crackers turn out perfectly:
- Overheating White Chocolate: White chocolate seizes very easily. Melt it slowly and gently, stirring constantly, and avoid direct high heat.
- Not Crushing Candy Canes Enough: Large chunks can be hard to bite into. Aim for a mix of fine and small pieces.
- Letting Chocolate Set Too Soon: Sprinkle the candy canes immediately after coating the crackers, before the chocolate starts to harden.
- Skipping the Parchment Paper: This will make your life much harder when trying to remove the set crackers.
Storing Your Peppermint Crackers
Store your finished peppermint crackers in an airtight container at cool room temperature. They should stay fresh and delicious for up to 1-2 weeks. If your kitchen is warm, or if you live in a humid climate, it might be best to store them in the refrigerator, though this can sometimes make the chocolate slightly chalky. For longer storage, you can freeze them for up to 2 months; ensure they are well-wrapped to prevent freezer burn.
Frequently Asked Questions (FAQs)
***Can I use regular chocolate chips instead of white chocolate?***
Absolutely! Milk, dark, or semi-sweet chocolate chips will work beautifully. The flavor profile will be different, but still delicious. Just follow the same melting and coating process.
***How do I get the candy canes to stick better?***
Sprinkle the crushed candy canes immediately after coating the crackers, while the white chocolate is still wet. Gently pressing them into the chocolate can also help them adhere more securely.
***Can I make these gluten-free?***
Yes! Use gluten-free graham crackers or a gluten-free cookie base like rice cakes or gluten-free digestive biscuits. Ensure your white chocolate and candy canes are also certified gluten-free if needed.
***My white chocolate seized up. What happened?***
This usually happens if even a tiny bit of water or steam gets into the chocolate while melting, or if it’s overheated. White chocolate is particularly sensitive. Always use clean, dry utensils and bowls, and melt on very low heat.
***How long will they last?***
Stored properly in an airtight container at room temperature, they should last for 1-2 weeks. For best results, keep them away from heat and humidity.
Ready to spread some holiday cheer with these delightful Peppermint White Chocolate Crackers? Try this recipe and let us know how it turns out in the comments below! We love seeing your festive creations!
Peppermint Crunch White Chocolate Covered Graham Crackers: A Festive Treat!
ThesePeppermint Crunch White Chocolate Covered Graham Crackersare a quick and festive treat perfect for the holiday season! With creamy white chocolate, crunchy graham crackers, and refreshing crushed peppermint, they’re easy to make, beautiful to gift, and absolutely delicious!
Ingredients
- 10 oz. Ghirardelli White Chocolate Melting Wafers
- 8graham crackers
- Crushed peppermint
Instructions
- Place Ghirardelli White Chocolate Melting Wafers in amicrowave-safe container.
- Microwavechocolate for 1 minute. Stir thoroughly until smooth. If needed,microwaveat 15-second intervals, stirring each time, until fully melted. Avoid overheating.
- Dip each graham cracker into the melted chocolate, coating both sides. Use a fork to lift and place onparchment paper.
- Sprinkle crushed peppermint on top of the chocolate-coated graham crackers.
- Let the graham crackers sit at room temperature until the chocolate is set.
Notes
For added flavor, try milk or dark chocolate instead of white chocolate.
Store in an airtight container for up to a week, or refrigerate if your home is warm.
Crushed candy canes can be used as a substitute for peppermint.
Nutrition
- Calories: 120
- Sugar: 10g
- Fat: 6g
- Carbohydrates: 16g
- Protein: 1g
“`
Leave a Reply