“`html
Table of Contents
Holiday Wreath Cookies – A No-Bake Delight
Don’t Let the Holiday Rush Steal Your Joy – Make Adorable, No-Bake Wreath Cookies in Minutes!
Are you scrambling to find festive yet easy-to-make treats for the holiday season? Do you want a recipe that’s not only delightful to look at but also a joy to create, especially with little helpers? Look no further! These no-bake Christmas wreath cookies are the answer to your holiday baking prayers. They are incredibly adorable, surprisingly delicious, and the perfect activity for kids during the festive period. Imagine a table laden with homemade goodies, and these charming wreaths stealing the show – all without turning on the oven! Let’s dive into creating some magic with minimal fuss and maximum holiday cheer. Save this recipe now, and make your holidays a little sweeter and a lot simpler!
A Symphony of Sweetness: Ingredients You’ll Love
Crafting these delightful wreath cookies is a straightforward affair, using pantry staples that likely already grace your kitchen. The magic lies in their simplicity and the vibrant decorations that bring them to life.
- Crispy Rice Cereal: About 6 cups. This forms the crunchy, airy base of our wreaths. Think of it as the sturdy, delightful foundation.
- Mini Marshmallows: 1 bag (10 oz). These melt into a wonderfully sticky, sweet binder that holds everything together. They give a soft, chewy contrast to the crisp cereal.
- Butter: 3 tablespoons, unsalted. This adds a subtle richness and helps the marshmallows melt smoothly. It glimmers and adds a perfect sheen.
- Green Food Coloring: A few drops, gel or liquid. This is where the festive magic happens, transforming our white mixture into a vibrant green wreath.
- Sprinkles: A generous amount of holiday-themed sprinkles (red, green, silver, gold, star shapes, jimmies, nonpareils). These are our “ornaments” and add a delightful crunch and visual sparkle.
- Optional: Small Red Candy-Coated Chocolates or Red Sprinkles: For the “berries” or bow accents. These pop with color and a touch of sweetness.
Substitutions & Notes:
- Cereal: While crispy rice cereal is classic, you could experiment with other lightly sweetened puffed cereals, though the texture might vary.
- Marshmallows: If you can’t find mini marshmallows, you can use regular-sized ones, just ensure they melt completely. For a dairy-free option, look for vegan marshmallows.
- Butter: Margarine or a vegan butter substitute can be used instead of butter for a dairy-free version.
- Food Coloring: Gel food coloring tends to give a more intense, vibrant color with fewer drops. Start with a small amount and add more until you achieve your desired festive green.
Timing is Everything: A Speedy Holiday Treat
20 minutes
5 minutes (melting marshmallows)
25 minutes + chilling time
Approx. 12-15 wreaths
Compared to traditional baked cookies that require cooling, mixing, baking, and cooling again, these no-bake wonders are a dream. The active prep and melting time is astonishingly short, allowing you to whip up a festive batch even on the busiest of days. The primary “wait” time is for chilling, which is passive and doesn’t require your active supervision.

Crafting Your Festive Wreaths: Simple Steps to Sweet Success
These instructions are designed to be clear, easy to follow, and fun for everyone involved. Let’s get creative!
Step 1: Prepare the Base
First, prepare your workspace. Line a baking sheet with parchment paper or wax paper. This will prevent the sticky cookies from adhering to the surface. In a large, microwave-safe bowl, combine the mini marshmallows and butter. Microwave on high for 60 seconds. Stir well. If not fully melted, microwave in 15-second intervals, stirring in between, until the mixture is smooth and completely melted. Be careful not to overheat, as this can make the mixture tough.
Step 2: Form the Wreaths
Now for the color! Add a few drops of green food coloring to the melted marshmallow mixture. Stir vigorously until the color is evenly distributed. You’re aiming for a vibrant, festive green. Add more coloring if needed, a drop at a time, until you achieve your desired shade. Add the crispy rice cereal to the colored marshmallow mixture. Stir gently but thoroughly with a large spoon or spatula until all the cereal is coated. Work quickly, as the mixture will start to set.
Step 3: Decorate and Chill
Grease your hands lightly with butter or cooking spray to prevent sticking. Take about ¼ cup of the green cereal mixture and shape it into a ring or wreath shape on the prepared baking sheet. Make sure to create a hole in the center. Repeat with the remaining mixture. You can make them as big or small as you like! While the wreaths are still slightly sticky, liberally decorate them with holiday sprinkles. Press them gently into the surface. Add the red candy-coated chocolates or extra red sprinkles to resemble berries or a festive bow. Once decorated, let the wreath cookies sit at room temperature for at least 30 minutes to firm up. For a quicker set, you can place them in the refrigerator for about 15-20 minutes.
A Glimpse at the Goodness
While these cookies are a treat, it’s helpful to have an idea of their nutritional profile. Exact values can vary based on brands and sprinkle quantities used.
- Calories: Approximately 150-200 per cookie, largely from marshmallows, cereal, and butter.
- Carbohydrates: High, primarily from sugar in marshmallows and cereal.
- Fat: Moderate, from butter and any fat in the cereal.
- Protein: Low.
Please note: This is an approximation. For precise figures, calculate based on the specific ingredients you use.
Healthier Twists on a Festive Favorite
Want to make these slightly lighter without sacrificing flavor or fun? Here are a few swaps:
- Reduced Sugar Marshmallows: Many brands offer reduced-sugar marshmallow options, or you can find naturally sweetened alternatives.
- Whole Grain Cereal: While crispy rice is light, consider a lightly sweetened whole-grain puffed cereal for added fiber. Ensure it’s not too dense.
- Natural Sweeteners: A touch of maple syrup or honey can sometimes be used in place of some marshmallows, but this will alter the texture significantly and may require more cereal. Use with caution!
- Decorate Mindfully: Use fewer sprinkles or opt for naturally colored sprinkles. Cherries or small pieces of dried fruit can stand in for candy berries.
Serving Your Wreath Cookies with Flair
These cookies are stars on their own, but here are some ideas to elevate their presentation:
- Arrange them on a festive platter surrounded by other holiday treats like gingerbread cookies or peppermint bark.
- Place each cookie in a small cellophane bag tied with a festive ribbon for delightful party favors.
- Use them as edible decorations on a gingerbread house or Yule log.
- Serve alongside milk, hot chocolate, or mulled wine for a complete holiday experience.
Common Mistakes to Avoid
Even simple recipes can have little pitfalls. Here’s how to steer clear:
- Overcooking Marshmallows: Microwaving too long makes the mixture tough and difficult to work with. Watch it closely!
- Not Working Quickly Enough: The marshmallow mixture sets fast. Have your cereal ready and be prepared to mix and shape.
- Sticking Hands: Not greasing your hands when forming the wreaths will lead to a sticky mess. A little butter or spray goes a long way.
- Too Much Food Coloring: Start with less and add more. Too much can alter the taste or make your hands messy.
Storing Your Wreath Cookies
These cookies are best enjoyed within a few days of making them. Store them in an airtight container at room temperature. Avoid stacking them too high, as they can flatten or lose their shape. If they stick together, you can gently separate them. For longer storage, you can freeze them, but the texture might change slightly upon thawing. Ensure they are completely cooled and firm before storing.
Frequently Asked Questions
***Can kids really make these?***
Absolutely! Younger children can help with stirring in the sprinkles and pressing on the “berries” (if using melted chocolate). Older kids can help with measuring and mixing. Just supervise the microwave step.
***How do I get the hole in the middle?***
When shaping the wreaths on the baking sheet, simply press your greased finger into the center of the cookie to create the opening. You can also use the end of a wooden spoon or a small cookie cutter as a guide.
***Can I make these ahead of time?***
Yes, you can make them a day or two in advance. Store them in an airtight container at room temperature to maintain their freshness. They are best enjoyed within 2-3 days.
***What if my marshmallow mixture gets too hard?***
If your mixture starts to harden before you’ve finished shaping, you can try gently warming it in the microwave for a few seconds (again, watch very carefully!) or add a tiny bit more butter to help loosen it up. However, it’s best to work quickly to avoid this.
***Can I use different colors?***
Of course! While green is traditional for a wreath, feel free to get creative with other holiday colors like red or white. You could even make a rainbow wreath!
Wrap Up Your Holiday Baking with These Delightful Wreaths!
These Holiday Wreath Cookies are more than just a recipe; they’re an experience. They offer a simple, joyful way to add a touch of homemade charm to your festive celebrations without the stress of traditional baking. Perfect for little hands and busy parents alike, they are a guaranteed hit that brings smiles and holiday spirit. So go ahead, gather your ingredients, and let the no-bake magic begin. Save this recipe and share the joy!
Loved this recipe? Share your creations with us and tell your friends! What other no-bake holiday treats do you love? Let us know in the comments below!
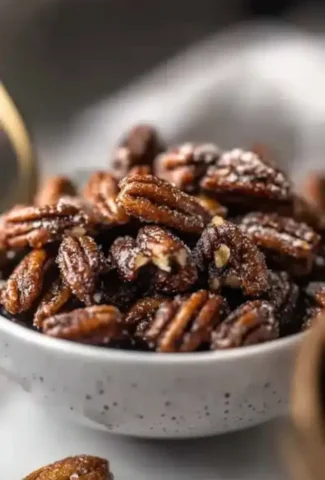
Stovetop Maple Candied Pecans (or Mixed Nuts)

Quick, easy, and naturally sweetened, these Stovetop Maple Candied Pecans (or Mixed Nuts) are the perfect snack or topping for salads, desserts, and more. Made with pure maple syrup and a hint of cinnamon, these crunchy nuts are ready in just 20 minutes and are endlessly customizable.
Ingredients
- 4 cupspecan halves (or any mixture of raw nuts like cashews and almonds)
- 1/2 cuppure maple syrup
- 2 teaspoonsvanilla extract
- 1 1/2 tablespoonscinnamon
- 1/2 teaspoonsea salt
Instructions
- Heat a skillet over medium heat. Add maple syrup, vanilla extract, and sea salt. Stir and warm for 1 minute.
- Add nuts and stir constantly to coat them in the syrup mixture.
- Sprinkle cinnamon over the nuts and stir again to ensure an even coating.
- Continue stirring as the maple syrup boils. Cook for 5–7 minutes, until the syrup is absorbed and no liquid remains in the skillet.
- Transfer nuts onto a parchment-lined surface and spread them out to cool. Optional: Sprinkle with a cinnamon-sugar mix for extra sweetness.
- Once cooled, break apart the nuts and store them in an airtight container.
Notes
Stir continuously to avoid burning the nuts.
You can omit the cinnamon for a simpler flavor or experiment withspiceslike nutmeg or cardamom.
Store in an airtight container at room temperature for up to 2 weeks, or freeze for up to 2 months.
Nutrition
- Calories: 201
- Sugar: 7g
- Fat: 18g
- Carbohydrates: 11g
- Protein: 2g
“`
Leave a Reply